Foundations:
I know the temptation to just get started on something is hard to resist, but setting up some basic tools and structure at the beginning of a project will be tremendously helpful to you down the line.

Just a heads up before you dive in as well, I’ll be using Python 2.7 for this project. While Django does support Python 3 , Python 2 is more widely used and easier to get up and running currently. Also I’m developing this project on a Ubuntu 15.04 machine, if you’re using another Linux distribution or another operating system all together you will need to do some searching on how to install some of the following packages (or your OS’s alternative) on your machine.
Virtual Environments:
For Python projects in particular you should consider installing and using the virtual environment package. You can use that link to help you install virtualenv, but we will also be covering the install below. There are many reasons to use a virtual environment but two of the biggest are what I’ll call insulation and replication.
Basically the first big reason, insulation, has to do with protecting other projects in or about to be in development. Many projects will require the same packages, but for example one project may need to use Django 1.8 while 1.9 may be a better fit for another project. Since having both installed ‘machine wide’ (globally) isn’t really an option, we use virtualenvs to have both versions installed and usable when their virtualenv has been accessed.
The second big reason, replication, is all about deployment to an external server or even just moving your development to another machine. When you create and work in a virtualenv you can record all the packages you are using. This record allows you to easily install an identical environment on an external machine so you spend less time combing through your .bash history looking for package installs and more time launching your project.

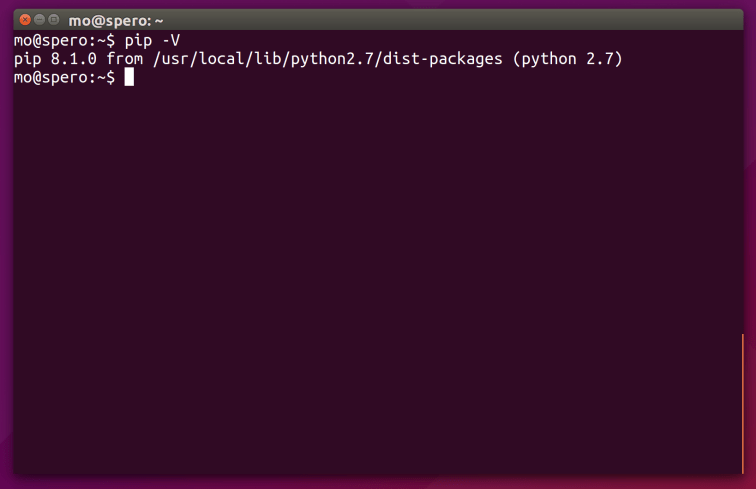
If you want to use the same tools I will be using, you may need to install pip before moving on. If however you are using Python 2.7.9 (or later) pip should be already installed on your machine. To check this simply run the following command in the terminal:
pip -V
You will see something like the below if pip is installed. If not I really recommend installing before you move ahead if you want to follow along step by step and also because pip is a useful package installer.
Virtualenv Setup:
Now that we’ve got all of that out of the way let’s get started making the foundation for our project. First up install and make our projects virtual environment. We are going to install virtualenv and virtualenvwrapper:
sudo pip install virtualenv
sudo pip install virtualenvwrapper
Export the WORKON_HOME variable which contains the directory in which our virtual environments are to be stored:
export WORKON_HOME=~/.virtualenvs
Make a directory for WORKON_HOME:
mkdir $WORKON_HOME
Now we need to put this export in our ~/.bashrc file so the variable is automatically defined:
echo "export WORKON_HOME=$WORKON_HOME" >> ~/.bashrc
Virtualenvwrapper requires us to import its commands (functions) into the ~/.bashrc as well:
echo "source /usr/local/bin/virtualenvwrapper.sh" >> ~/.bashrc
We need to be sure that if pip creates an virtual environment, it is also placed in our WORKON_HOME directory:
echo "export PIP_VIRTUALENV_BASE=$WORKON_HOME" >> ~/.bashrc

source ~/.bashrc
Now we will make a test1 virtualenv to see if our setup went as planned:
mkvirtualenv test1
If the name of your virtualenv is in parenthesis (test1) before your username, then you are now working in the virtual environment you created.
Now every time we setup a new virtualenv need to make sure it isn’t using our system wide packages by running:
python -c "import sys; print sys.path"
Congratulations! You’ve just set up your first virtualenv!

Now some commands to use in the terminal to start, stop, and remove (if necessary) your virtualenv.
Stop the virtualenv:
deactivate
Start (really re-start) the virtualenv:
workon test1
Forgot the name of your virtualenv? Use the below (b for brief or l for long, b works just fine for me but you may need to use l) to list all virtualenvs on your machine:
lsvirtualenv -b
lsvirtualenv -l
Remove your virtualenv (only do this if you’re sure!):
rmvirtualenv test1
Project Virtualenv:
Now that we know how to pour a solid foundation, let’s start designing our projects bones! This tutorial will specifically be following the steps I am undertaking to launch version 2.0 of my British Museum Map project. Your welcome to follow along and make your own version of BMM or feel free to flit in and out of the tutorial as it suits you, using it to help guide you on your own project.
First let’s make our virtualenv:
mkvirtualenv bmm
python -c "import sys; print sys.path"

Django:
Our virtualenv is up and running so we can now install the package versions we will be using for this project. For BMM I chose not to use some the of latest available packages as I wasn’t sure about their backwards capability and wanted to get a launchable version as soon as possible. You (and I) can always ‘migrate’ to the latest versions later if suitable but for now I’m going with the versions I’ve built projects with before.
Let’s install Django 1.8!
pip install django==1.8
Change directories to wherever you want your project to be stored, for me that’s /home/mo/Projects:
cd Projects
We don’t need to make a directory for our Django project, as the next command does this for us (under our current directory, in my case Projects) as well as setting up the most basic project format we can:
django-admin startproject bmm2
If you change directories to your newly started Django project you will see (you ls to list all contents) that another directory of the same same name and a manage.py file have been created within the project directory.

Pycharm and Git:
You can explore this directory however you like, I will be using the Pycharm IDE
and tracking all changes via the version control package git during this project. Both of these are totally optional and have many alternatives that you could use instead. You could use just a simple text editor and no version control if you like (though I wouldn’t recommend that last one). If you’re not using Pycharm and/or git feel free to skip down.
First open to the project directory (bmm2) in Pycharm. In the menu you will see the option of VCS, select it and navigate to Import into Version Control, and then select Create Git Repository.

From the dialog box select the directory (bmm2) and select OK.

Now we can see in our project directory tree a lot of files have a red text, this means they are not being tracked by git yet.
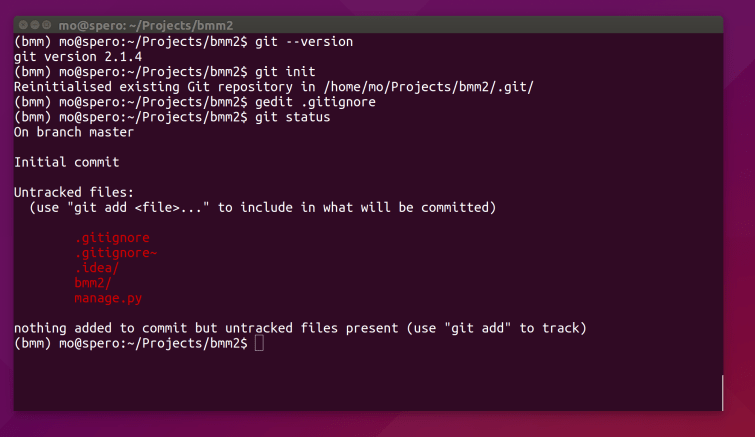
We can fix this! First go back to your terminal and check that you have git installed, if not you will need to install it yourself. To check your git version in the terminal:
git --version
Let’s make our directory a git repository (in upperlevel bmm2):
git init
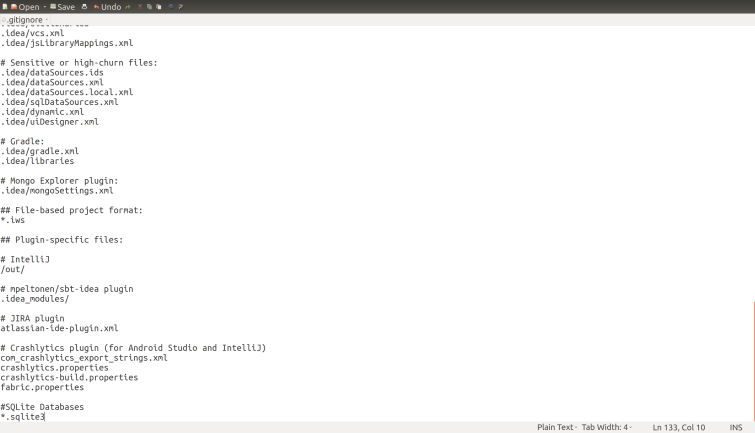
Before we add our remote origin on github.com, were going to make a quick detour and grab some lines for our .gitignore file. First we need GitHub’s own .gitignore and second we will need (if you are using Pucharm) JetBrains .gitignore.
We will also be adding the following lines to end of our own .gitignore file, as we will be using the SQLite database and we don’t need git to track these files:
#SQLite Databases
*.sqlite3
Back to our terminal and we will use a simple text editor to paste the .gitignore lines into our own .gitgnore file:
gedit .gitignore
It will look a little something like the below.
Once you’ve pasted all the necessary information into your .gitignore, navigate back to the terminal. Now we’ve made our repository and told git which files don’t need tracking, it’s time to push our git repository to github.com.
To see the status of all files in the git repository:
git status
You will see all the files are in red.
This is because we have not added our file to git tracking yet. To add all the contents of the directory to git use the command (the ‘.’ here just stands in for everything):
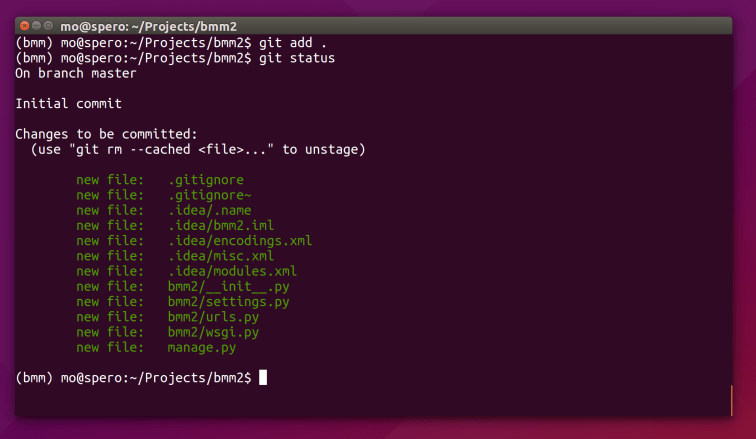
git add .
Now if we check the status of the file in our repo we will see everything in green is being tracked:
We want to commit these changes to our repo with a short message which sums up the changes made or bugs fixed, think short and sweet:
git commit -m 'first commit'
Before you move on any further, you may want to also make a readme file and add it as well, you can just put a simple message in here for now as it can always be changed later:
gedit README.md
If you’ve made a readme don’t forget to add and commit changes for it before proceeding to adding the remote origin and pushing our changes to GitHub. The easiest way to add a new repository to GitHub is to selct the black ‘+’ button next to your profile image on the top right of GitHub.com and use the command provided for remote origin there, like so:
git remote add origin https://github.com/MoSherman/bmm2.git
git push -u origin master
You will be prompted for your username and password at this point, which you will need to enter into the terminal. Once that’s done you should be able to see on your GitHub profile page that the new repo has been added!
Back in Pycharm you will see all the filenames have returned to a neutral colour as they are being tracked by git and have not had any changes made to them. Throughout the development process file colours may change, if you’re not sure why a file’s colour has changed check out JetBrains guide to File Status.
Django Projects:
Now that we’ve laid the groundwork let’s talk a little bit more about what goes into a Django project.
The project itself is the uppermost (top-level) bmm2 directory. Within the project we have our nested apps (bmm2) and our manage.py file. For now we only have one app (bmm2) but we could add more here if we needed to. In future I’ll use project level bmm2 and app level bmm2 to distinguish between these two directories.
Our app level bmm2 contains our settings.py and wsgi.py, you can explore these files in Pycharm to get a sense of what they do. In the next blog we will make some more apps, but for now just stick with what was created for you when you ran the original start project command.

Within the project level bmm2 we also had the manage.py file. This essentially contains all the Django based commands we will use in the terminal. For example when we get to the point in our development process that we need to run the Django server we will use the following command (don’t run this yet though, as we are not quite there!):
./manage.py runserver
This command accesses the runserver function built into Django. If you want to understand or read more about the django-admin and manage.py file check out Django’s documentation.
Remember that record of all packages we talked about earlier? Now that we’ve actually installed some packages lets go ahead and make that, don’t worry we can update it later after we add more packages. To make this record we use a command called pip freeze to write our environments details into a requirements.txt file. To do this enter the command:
pip freeze
This will display all the curreent packages installed. Now check and make sure you are in the project level bmm2 and run the following command:
pip freeze > requirements.txt
To see the contents of requirements.txt:
cat requirement.txt
MVC, MTV, and Django:
You may have heard of MVC or Model – View – Controller software design pattern before. At its most basic it separates the three essential pieces of many software applications.
The Model – contains the database and data which sits behind your application. The View – is the output of the application usually a web page. The Controller – accepts user input and acts as the middleman to the Model and View, at it’s most basic querying and returning data from the Model and passing it to the View to be displayed to the user. This same basic architecture is used in a lot of software design. Django however added a bit of a twist on the traditional MVC, though it still functions in mainly the same way.

Django uses the MTV or Model – Template – View pattern. Let me re-iterate that it is basically the same as MVC, with some minor semantics changes being the most prevalent point.
The Model – still the database and data, there is some additional functionality here, but nothing we need to worry about right now. The Template – this is the ‘view’ from before, it is the output which the user sees, normally a web page. The View – this is the ‘controller’ from before, it is basically the same, to help you distinguish from the other ‘view’ remember that this view is more like ‘the all seeing eye.’ The View ‘sees’ the data in the Model and decides what the user will see in the Template.

This Time and Next Time:
Ok so I won’t pretend like that wasn’t a whole lot of information at once. We learned what a virtual environment was and how to set one up for our projects. We talked a bit about Pycharm’s IDE and git version control, though you may be using something different. We took our first steps with Django admin by starting our project and getting it ready for development and we covered how a Django project works. We also learned a little bit about Django’s MTV design pattern and how it differs from the traditional MVC pattern.

Our next blog entry will delve into how we actually use the T(emplate) and V(iew) of our MTV pattern, and if there’s time an intro on the M(odel) of our project as well. I am trying to keep all the entries under 5,000 words so as not to exhaust you too early in the development process however, so we may leave the M to the next entry.
